Dual Booting Encrypted Arch Linux and Windows 10 Installs With Shared EFI Partition
I’ve been running linux as my primary laptop OS for multiple years now. Like most people, I had my first experience with linux when I installed ubuntu on an older laptop. I happened to be in High School at the time and that laptop happened to be a
Dell XPS M1710 (Yes, with the LEDs!) Since then, I’ve moved around quite a bit. We used CentOS exclusively in my linux classess at Indian Hills, so naturally,
I evolved into a fulltime Red Hat user. This is a Habit I still haven’t given up as I still use CentOS almost exclusively for any servers I build. For a while I was running Fedora on my laptop, which I also liked quite a bit. Eventually, I got bored of
Fedora and decided I wanted a challenge, so I decided to give Arch a try. It’s been about two years since my first arch install and I haven’t looked back since.
Despite all the stigma surrounding the OS, I’ve enjoyed a wonderfully stable and relatively user friendly experience. In my two years of use my arch install has only every ‘broke’ once and, as it so often is, it was entirely my own fault. This could be
attributed to the fact that I normally use a ‘polished’ desktop environment like gnome or deepin rather than picking and choosing gui components one by one, and it could also be because I genuinely enjoy understanding how my OS works. None the less, I’m
very happy with it and plan to continue using it for a while. The only caveat to arch is that there are still so many things that tie me to a windows enviornment that I can’t really afford to be caught without a windows install. In school, this was because
I had to use the infamous lock down browser, which refused to be run in a VM or on linux, and now as a professional in mainly windows/vmware centric infrastructure I need tools that simply don’t have a viable linux alternative. The solution to this (for me)
has always been to dual boot my install. Dual booting Windows 10 and Arch linux is well documented and relatively easy to set up, but some behavior of windows 10 can make this relatively troublesome to maintain. Namely, with the break neck speed at which
Microsoft releases feature updates to Windows 10, the consumer branch of windows tends to reinstall itslef every few months, clobbering your boot loader and making it impossible to boot back to your linux distro. Dual booting can also present unique
challenges in securing your system, namely with full disk encryption.
After a few installs, I’ve settled into a method of installation that seems to work well for me, so I wanted to share. What I do is install my linux boot loader along side the windows 10 boot loader in a single shared EFI partition. This tends to prevent
Windows from clobbering the boootloader, meaning it survives feature upgrades. Following this, I encrypt each install at the partition level, meaning each install is secure in it’s own right. Most of this I learned from this guide: ‘Joh.Fi/blog’. ‘Encrypted Windows and Arch Linux dual-boot installation using UEFI’.
I wanted to supplement this guide with a step by step set of instructions, and a list of the resources I needed to complete the full picture (bottom of page). So, without further adieu, let’s walk through the steps of installing Windows 10
and Arch Linux for dual booting with a shared EFI partition and using partition level encryption.
Step 1: Install Windows
Start off by booting into your Windows install media on the target machine. We have to install windows first because it refuses to behave like there are any other OSes in the world. I’ll be using an ISO of Windows 10 LTSB, but any version should work. (Note,
Bitlocker is not available in the home version). Because we’re going to be sharing efi partition, we’ll need to manually create one that’s larger than what windows creates by default. It can work with a default sized EFI partition, but it makes it difficult to do kernel upgrades in the future.
In the installer, Next Next Next until you get to this page where you select your disk to install to:
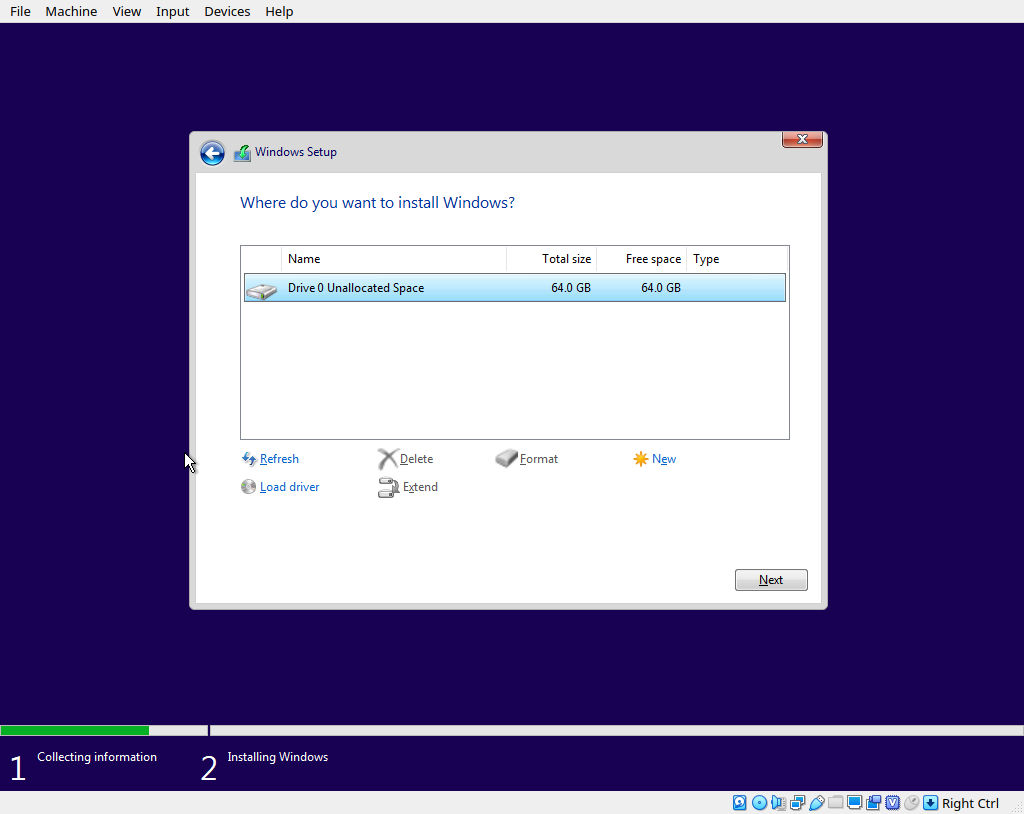
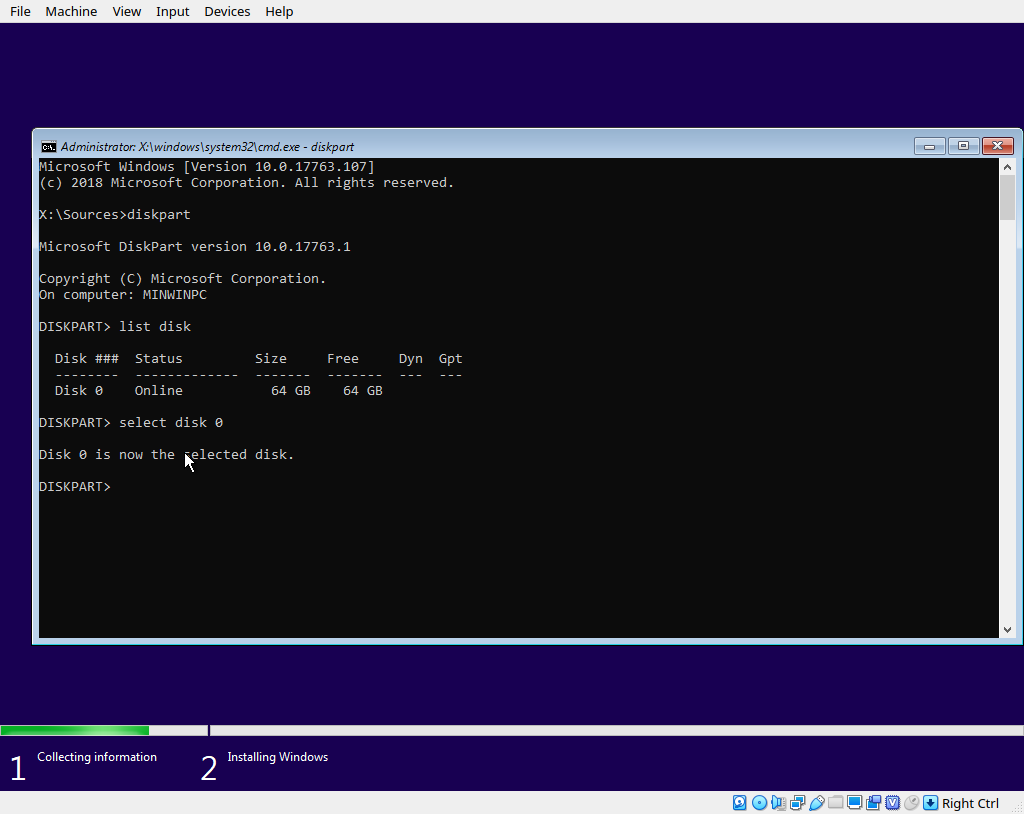
Double check that your disk shows up as empty, if not, no big deal, we’ll clean it out soon. Press Shift + F10 on your keyboard to open a command prompt, and in this command prompt run the ‘diskpart’ command to launch the disk management tool.
Inside of diskpart, use the ‘lisk disk’ command to list all available disks, and identify your target disk. Once you know what disk you want to use, select that disk using the unique number that diskpart assigned to it. In my example I only have
one disk, so I use disk 0.
If your target disk is not empty (i.e. contains other partitions) we can clean it using diskpart. Just issue the ‘clean’ command, which will erase all partitions from the disk. If you have existing partitions on this disk, this will destroy them
and make their contents unrecoverable.
Moving on, go ahead and make sure your disk is GPT partitioned by running the ‘convert gpt’ command in disk part. Now we’re going to create our EFI and Windows partitions. Enter these commands, replacing variables for size as necessary:
create partition efi size=1024
format quick fs=fat32 label="System"
assign letter="S"
create partition primary size=32768
format quick fs=ntfs label="Windows"
assign letter="W" 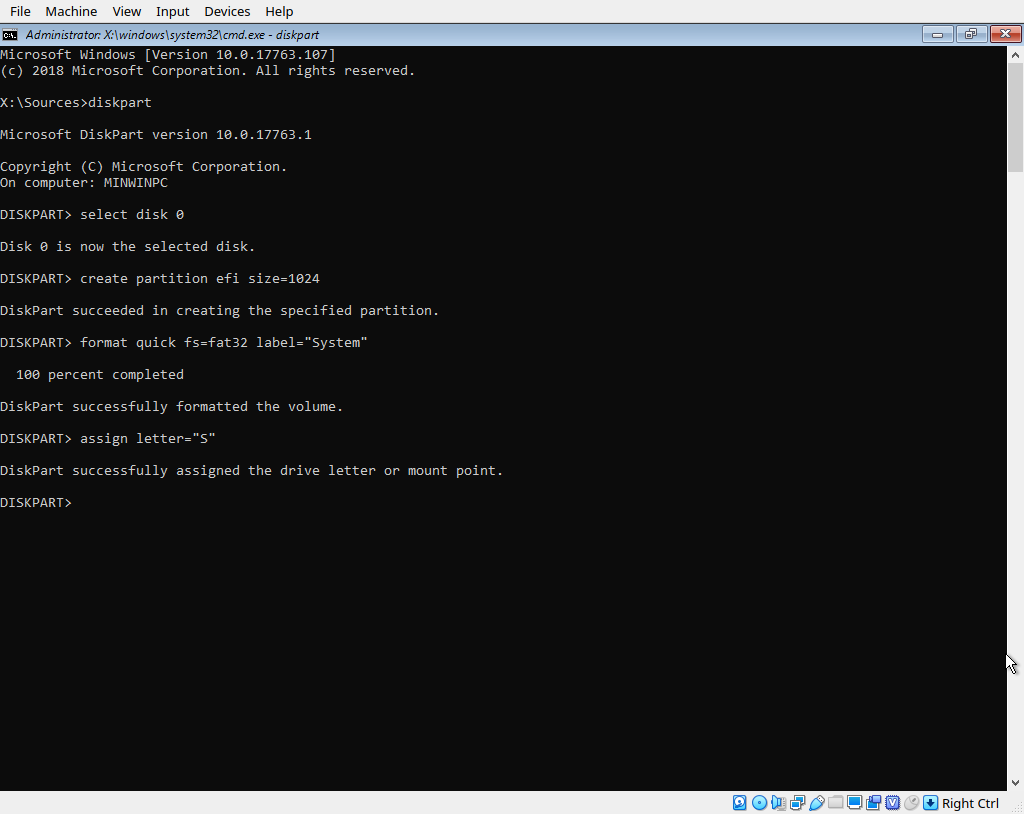
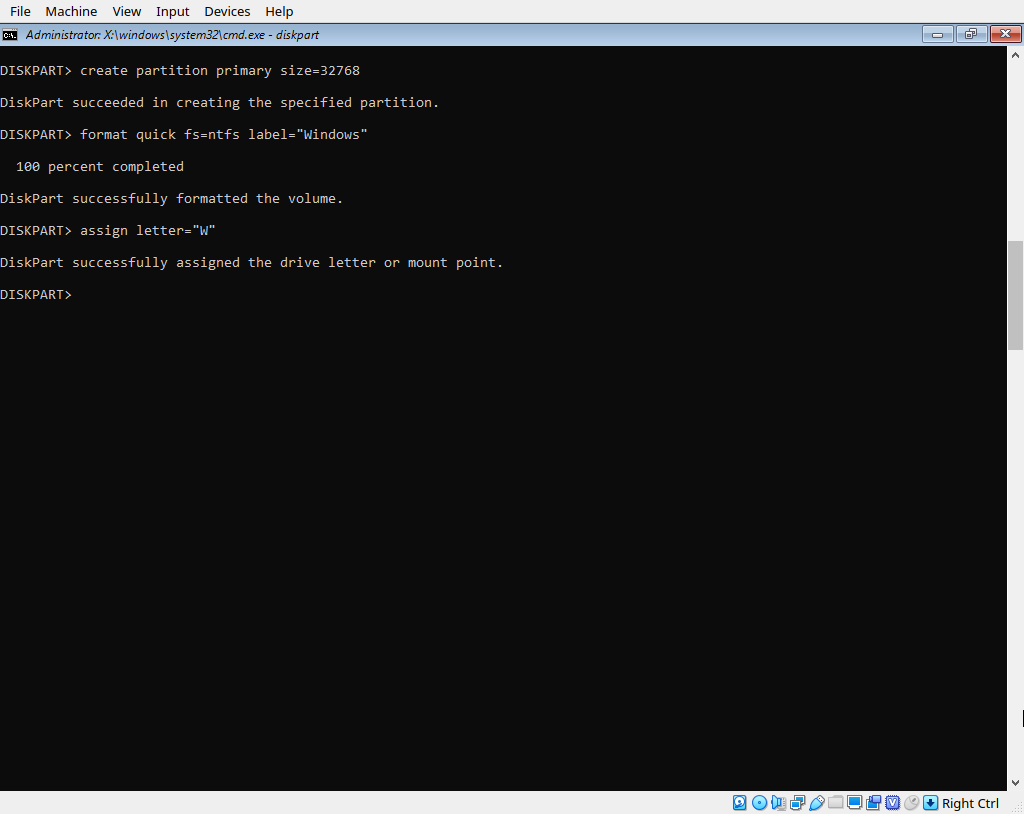
The size values are expressed in MB. So if you want to specify size in GB, just mutliply the desired size in GB by 1024. So my 1 GB EFI partition is 1024, and my 32 GB Windows partition is 32768. If you fancy, you can verify these partitions were
created with a quick ‘list part’ command. Now that our partitions are setup, close the cmd prompt and refresh the disk pane in the installer GUI. You should see your new partitions.
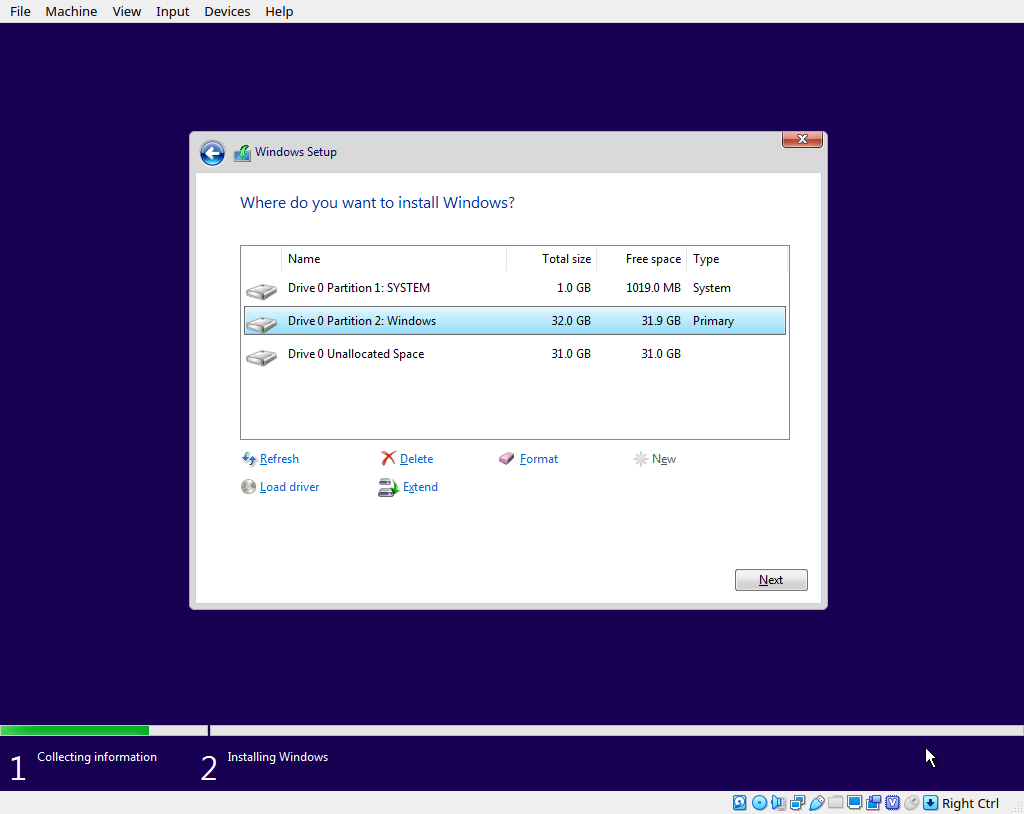
Highlight the “windows” partition and click next to start installing. The installer doesn’t say it anywhere, but because there is already an EFI partition mounted at ‘S’ it will use it instead of creating its’ own. Now just click through the GUI like you normally would.
After fighting your way through the out of box experience, you’ll end up at a windows desktop. Once here, you should open up disk manager (Run diskmgmt.msc) and verify that the partitions on your disk look correct.
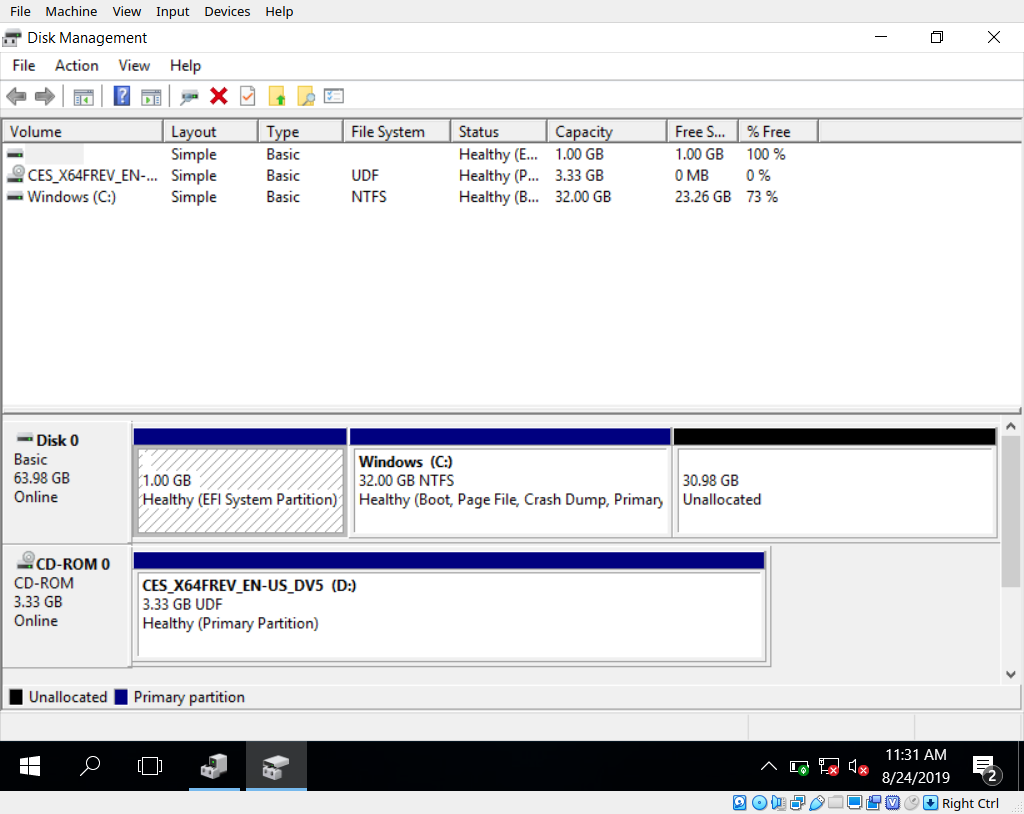
You should see your efi partition, one windows partition, and maybe another microsoft reserved partition. As long as your EFI partition is sized correctly and you have some unallocated space left to work with, everything is good here. When you’re ready, swap your windows boot media for you arch linux media and reboot into the arch live image to install it.
Step 2: Install Arch
Boot into your arch linux live media. The first thing we should do when booting into a live linux environment is make sure that we have everything we need to continue the installation process. It would be frustrating to go through the trouble of partitioning your disks just to realize you have no network and need to start over
First off, verify that you’ve booted using EFI. Check to see if the file ‘/sys/firmware/efi/efivars’ exists. If it doesn’t, you’re not booted in UEFI mode. If you want to use another keyboard layout, now’s the time to do so. You can get instructions on this at the Official install guide .
You’ll need to be connected to the internet to complete the installtion, so make sure you have a good internet connection. Try the command ‘ping archlinux.org’. If you get a reply, everything is working. Once your internet is confirmed working, you can set your local system time using NTP to ensure you have accurate time. Run the command ‘timedatectl set-ntp true’
Now let’s identify our disks. We’ll be using the fdisk utility. First we need to identify the disk itself, which will likely be /dev/sdx where x is a unique letter. If you only have one disk it’s probably /dev/sda. Either way, run the command ‘fdisk -l’ and
review the results to find out which disk contains our windows install
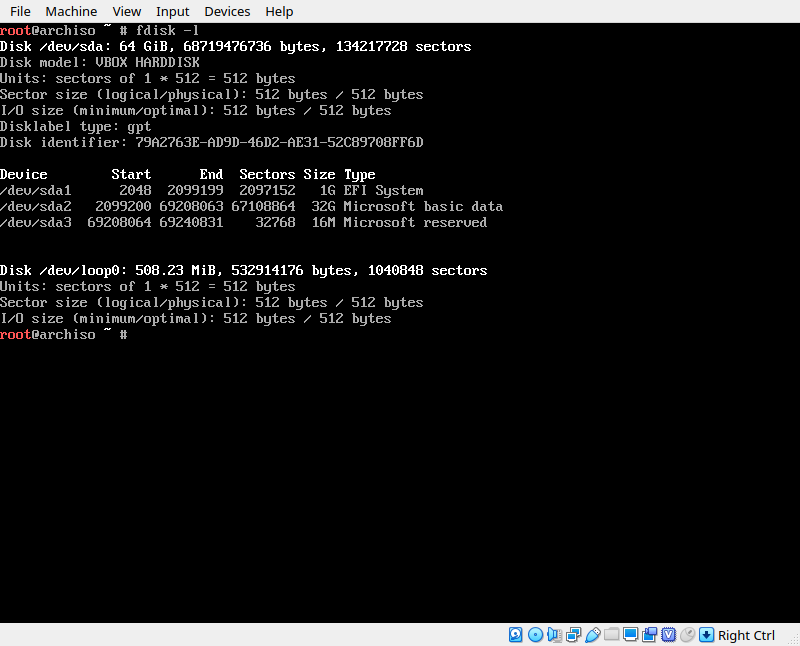
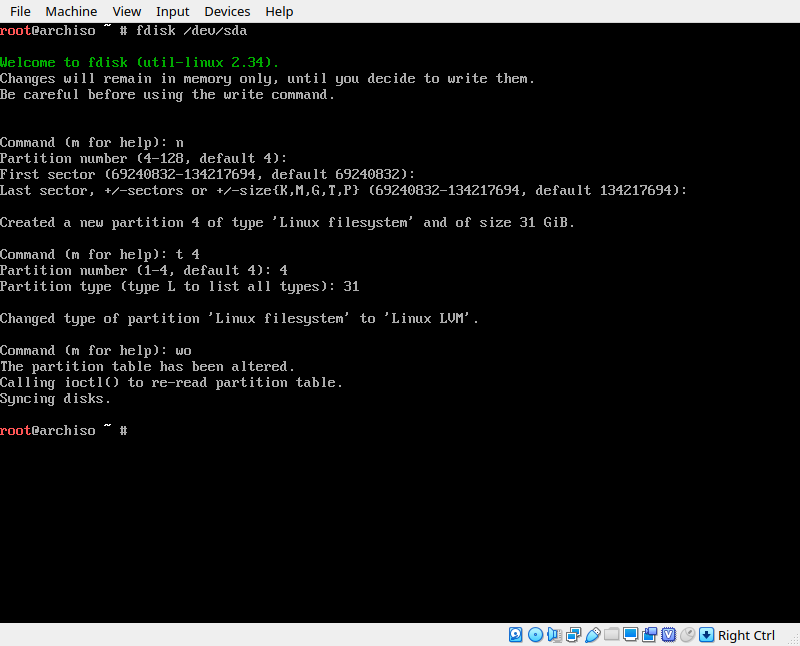
Based on this output I know my disk is /dev/sda because it contians my EFI partition (sda1) and my Windows partition (sda2). Now that we know what disk to use, we can start an interactive fdisk session to configure this disk. Enter the command ‘fdisk /dev/sdX’ where X is the unique letter assigned to your drive. Then ‘n’ command to create a new partition, and accept all the defualts by pressing enter, (this will asign the next available partition number, and start and stop at the first/last available sector). Next, use the ‘t’ command to set the partition type to “Linux LVM” which is type 31
when you’re done, use the ‘wo’ command to write the changes to disk. If you make a mistake, you can exit without writing to restart.
Next, we’re going to encrypt the entire LVM partition we created. We do so using the cryptsetup tool provided in the live ISO. Run the command ‘cryptsetup luksFormat /dev/sdx’ where sdx is your partition. In my case, this was sda4.
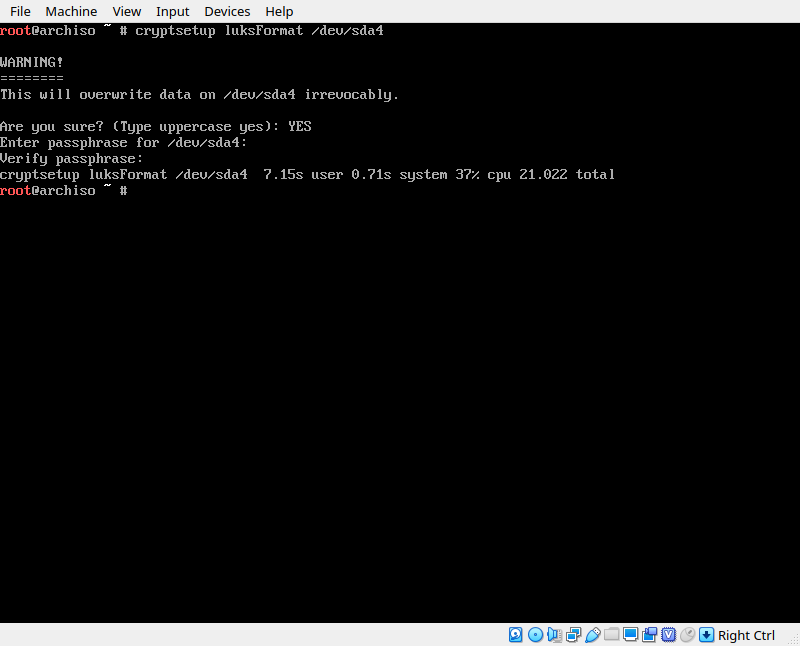
Once that completes, the partition is left locked and unmounted, so we have to unlock it and mount it. Run the command ‘cryptsetup open /dev/sda4 cryptlvm’ (replacing sda4 with your own partition number). This will prompt you for your passhprase and then make the partition available at /dev/mapper/cryptlvm.
Now we need to create our LVM filesystem inside of this encrypted partition, We’ll start by creating a physical volume on the partition, then we create a volume group inside that physical partition, and then we create logical volumes inside of that volume group. Do so by running these commands:
pvcreate /dev/mapper/cryptlvm
vgcreate VolGroup0 /dev/mapper/cryptlvm
lvcreate -l 100%FREE VolGroup0 -n Vol0
If you’d like to create any additional partitions, such as swap or an separate mount point for /var or something, you can do so here. I’ve just chosen not to, so I create one volume consuming all available size.
Now we just need to initialize the ext4 filesystem inside our logical volume, mount it, and then we can use it as our install destination.
mkfs.ext4 /dev/VolGroup0/Vol0
mount /dev/VolGroup0/Vol0 /mnt
and now we need to create a mount point inside our new root filesystem for the efi system partition. This should be mouned at /boot so we create the directory /mnt/boot and then mount our efi partition (sda1) to that directory
mkdir /mnt/boot
mount /dev/sda1 /mnt/boot
Now we can continue through the rest of the official install guide, knowing that our destination file sytems are mounted where they should be. The next step is to pacstrap our new root filesystem. This is what actually installs the system, it grabs the set of packages that is arch linux and installs them to the filesystem you specify. How versatile! Run the following command:
pacstrap /mnt baseNext we generate our FSTAB configuration. FSTAB is the service that tells the kernel what partitions it needs and where they are, along with instructions to mount them. The live ISO comes with a handy tool that will generate this configuration for us
genfstab -U /mnt >> /mnt/etc/fstabNow we can chroot into our new install, which will be like manually booting into it.
arch-chroot /mntNow according to the official install guide, the next step is to configure the system time zone and initialize the hardware clock. This is done by simlinking one of the provided time zone files to /etc/localtime. Run these two commands, replacing the time zone information with your own.
ln -sf /usr/share/zoneinfo/US/Central /etc/localtime
hwclock –systohc
Now we’ll build our locale, which is important for language and input puroses:
Nano (or vi) into /etc/locale.gen and uncomment your locale. If you’re unsure which one to use, and you’re reading this guide in english, just use en_US.UTF-8 like the install guide suggest. (if the locale.gen file doesn’t exist, run locale-gen once and then try again)
after selecting your locale, run ‘locale-gen’
Now create the /etc/locale.conf file and put your language preference in there. Again, if you aren’t sure what to use you probably want en_US.UTF-8
Now create the /etc/hostname file and put your hostname in there
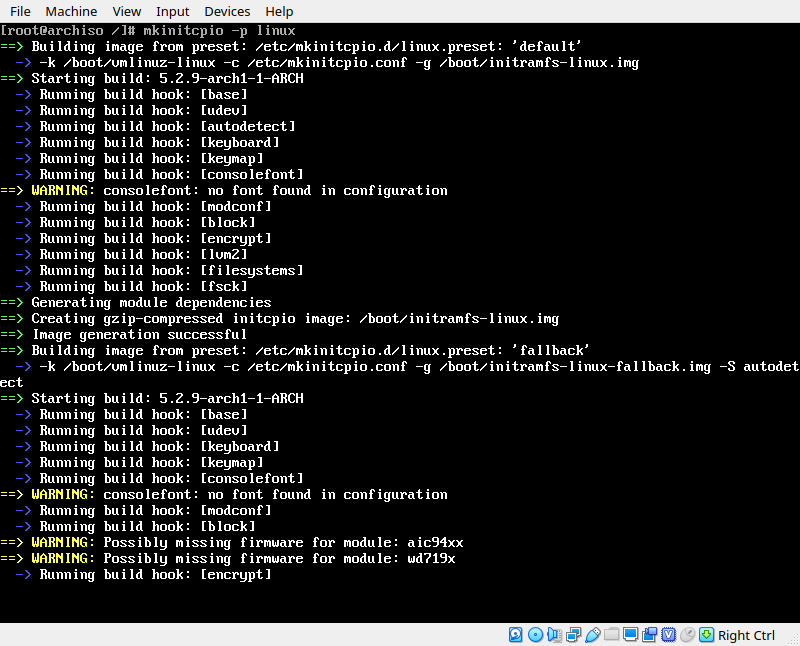
echo 'arch' > /etc/hostname Now we need to deviate from the install guide a little bit again. We’re going to configure our initramfs, but because we’re using LVM on an LUKS encrypted paratition, we have to include the relevant hooks in our initramfs so that the kernel has everything it needs to handle the encrypted lvm partition. open the /etc/mkinitcpio.conf file with your favorite editor and find the HOOKS line. insert the hooks, keyboard, encrypt, lvm2. The order of these does matter, so yours should match this exactly

Now we can generate our initramfs image. Run this command:
mkinitcpio -p linuxWath the output for erros. Warnings are ok, as long as the process finishes successfully.
Step 3: Install and Configure GRUB
Now you have a configured install. The last thing to do is install and configure the bootloader. Start off by installing the package and it’s dependencies:
pacman -S grub efibootmgrOnce those packages are installed, use the following command to install grub to our boot partition.
grub-install --target=x86_64-efi --efi-directory=/mnt/boot --bootloader-id=GRUB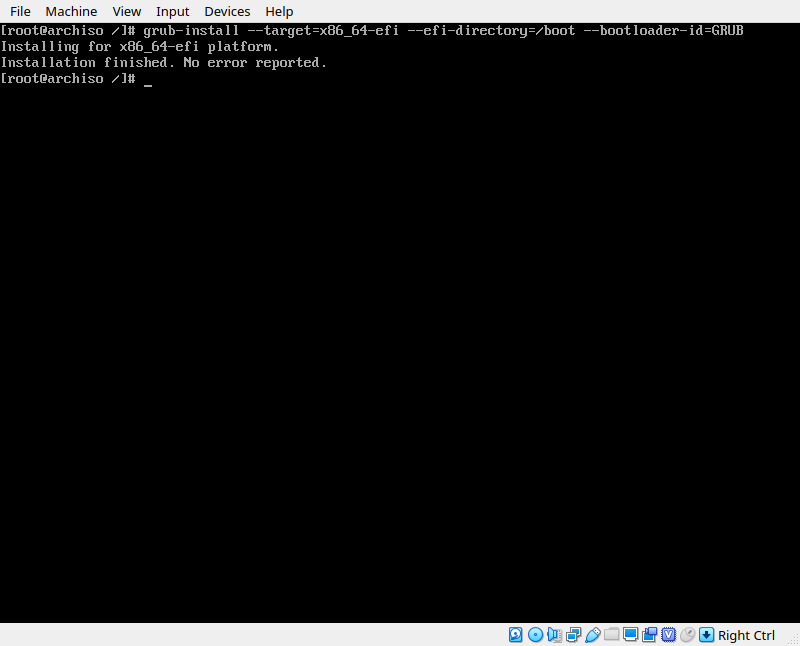
This will install the boot loader, but it needs to be configured for our new system. In an encrypted system, grub tells our kernel where to find it’s disks by passing that info to the kernel as arguments. So we have to tell grub what to tell the kernel when it boots. According to the install guide, we need to pass the UUID of our device and it’s mount point to the kernel using this syntax:
cryptdevice=UUID=device-UUID:cryptlvm root=/dev/MyVolGroup/rootIn my case, cryptlvm is on sda4, so let’s use the blkid command to find the UUID of sda4:
blkid | grep sda4Now we just need to copy and past that into our file. There’s no copy paste functionality that I know of in the live ISO, so I normally just echo it into the end of the /etc/default/grub file and use nano’s copy paste feature to move it around in there:
blkid | grep sda4 >> /etc/default/grub So nano into /etc/default/grub and find the output of blkid at the bottom. Ctrl+K to cut, and CTRL+U to paste. Paste the line into the blank space underneath the GRUB_CMDLINE_LINUX=”” line, and then erase everything but the UUID. Then, using your UUID, complete the command. For reference, mine is:
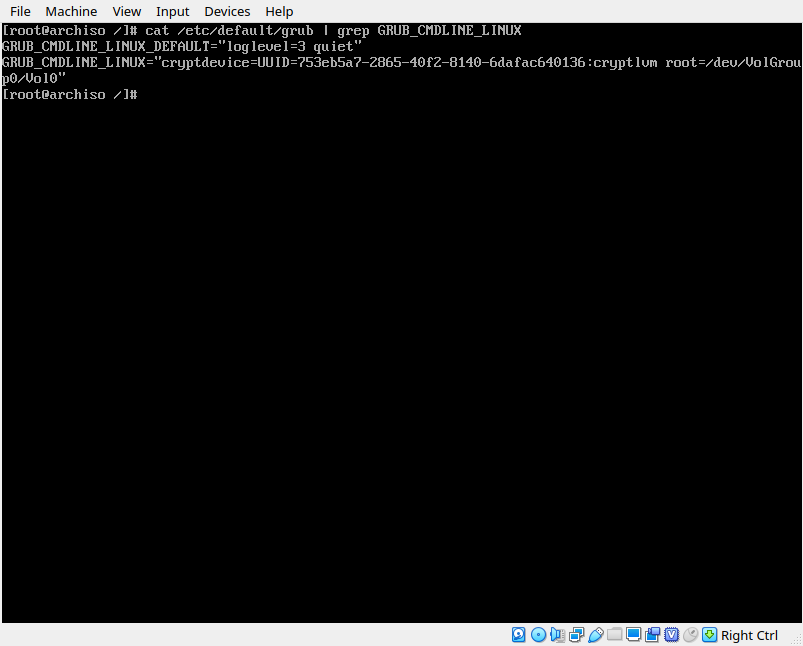
Notice I’m using the names of LVM components, such as ‘cryplvm’, or VolGroup0? These have to match the components you created in earlier steps. Cryptlvm is the physical volume group I created, volgroup0 is the logical volume group I created, and Vol0 is the logical partition I have mounted at /mnt, and will be the file system that the kernel is looking for.
Double, even triple check this line for accuracy, and then save and exit. Now build your grub config:
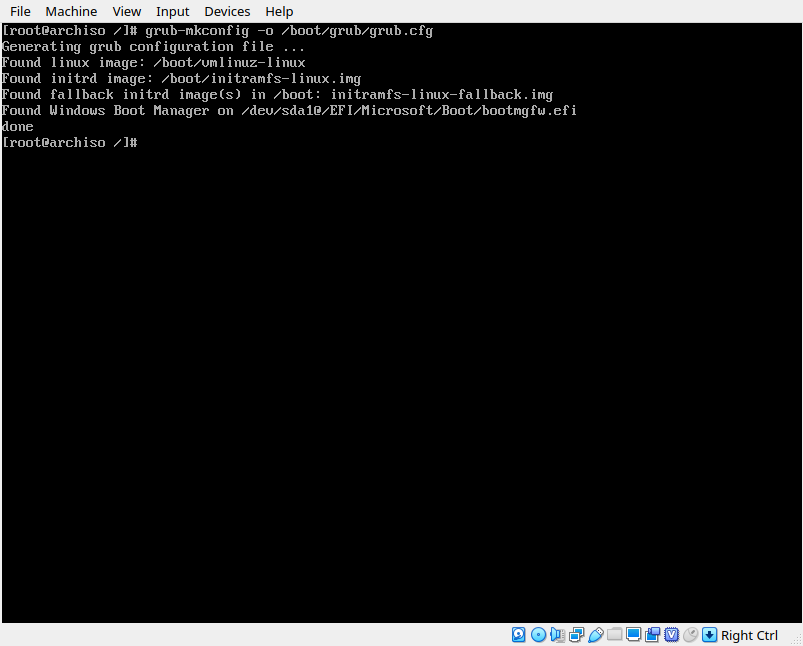
grub-mkconfig -o /boot/grub/grub.cfgIn the output of this command we can verify that it found our linux install, but it might not have found our windows install. If you don’t see anything about grub finding a windows install in the output of this command, install the packages os-prober and ntfs-3g and try again
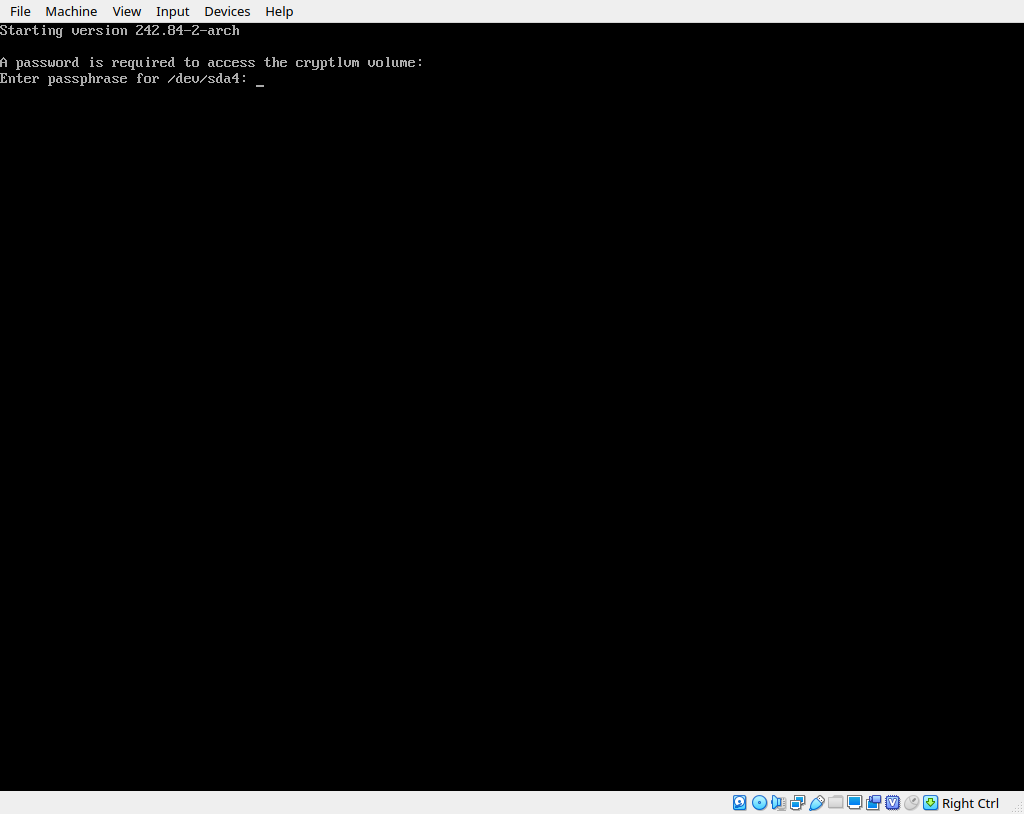
Now for the moment of truth. Let’s try to reboot. exit your chroot session and type reboot. If everything goes well, we should be greeted by the grub splash screen shortly. We can select our Arch option, and hopefully we’ll be greeted by a passphrase prompt. Entering our passphrase should continue the boot process and shortly drop us to the login page of our new arch install.
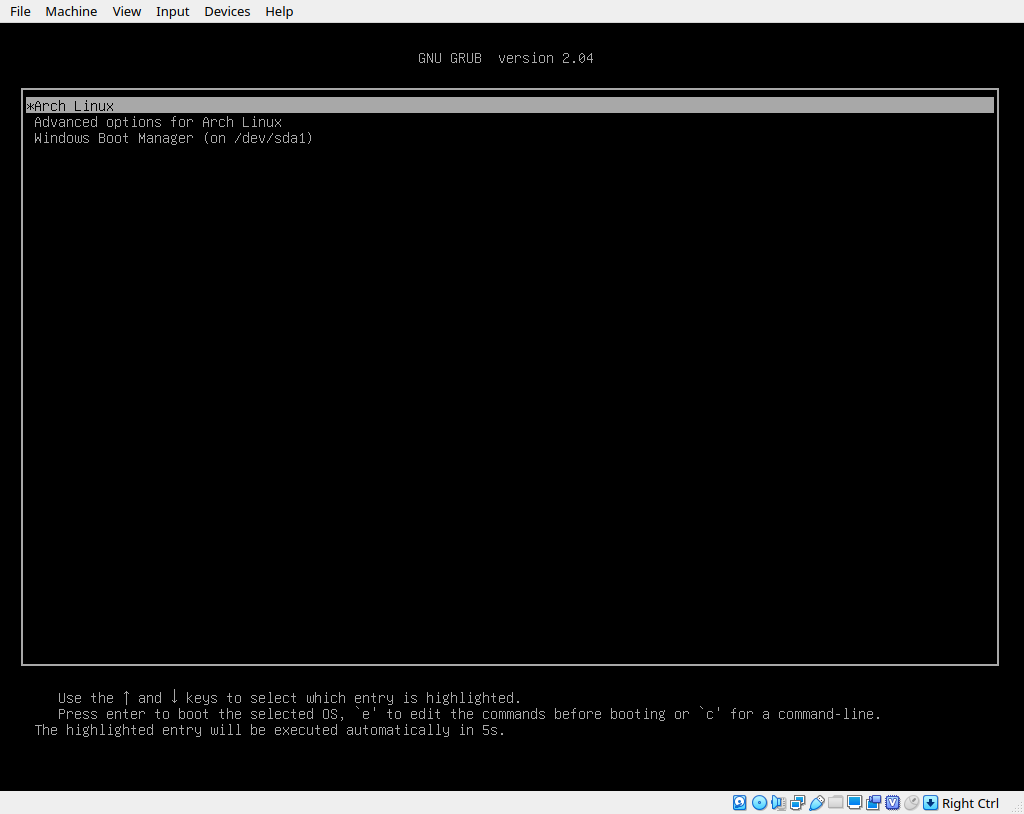
If that worked, reboot once more, selecting the option to boot windows. Both should be working by this point.
Step 4: Configure Bitlocker
The last step of this process is to configure bitlocker for our Windows install. If we try to do this as is, it will probably fail because it’s mad about not having a TPM. This is where Joh’s guide comes in. Following his instructions we can disable this and use Bitlocker without a TPM.
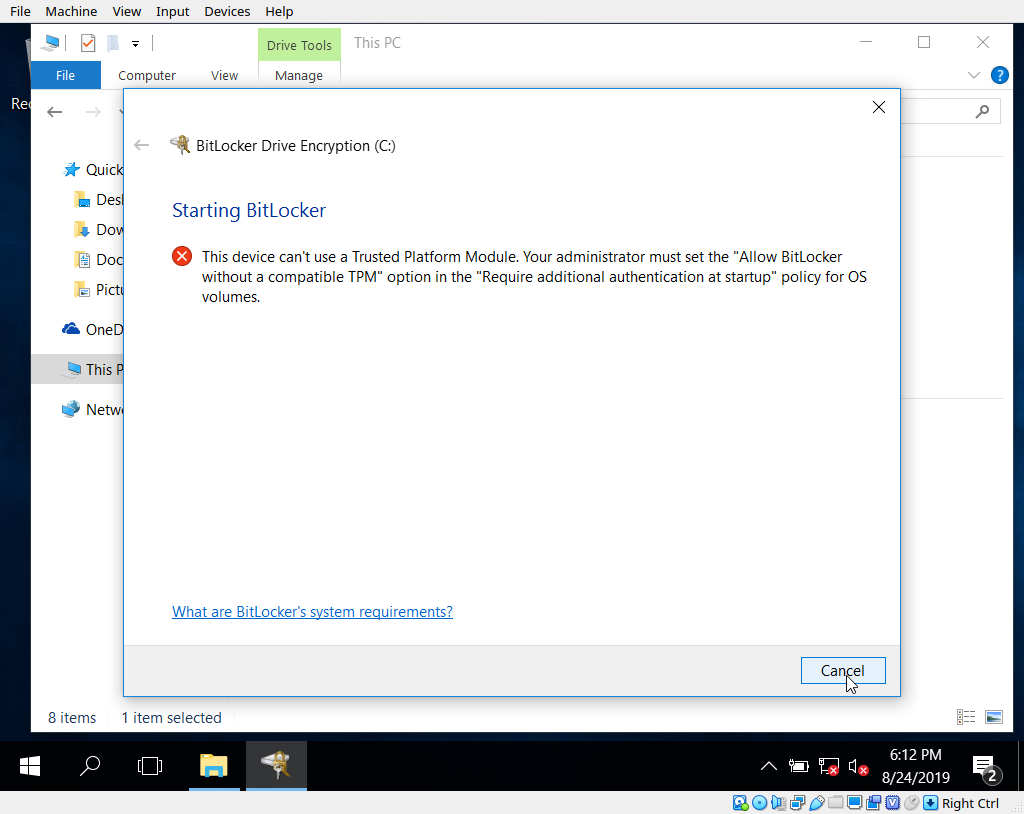
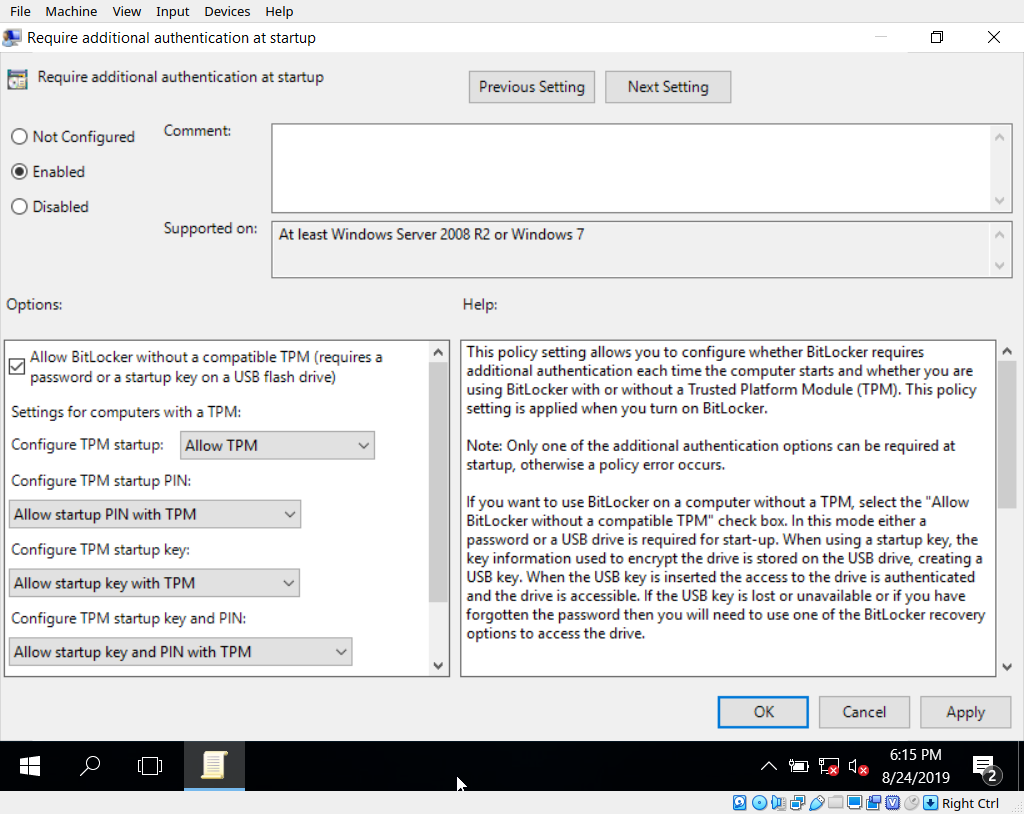
From within your Windows install, open up the group policy editor by launching gpedit.msc from a run/cmd prompt and navigate to Computer Configuration -> Administrative Templates -> Windows Components -> BitLocker Drive Encryption -> Operating System Drives. Open the settings entitled ‘Require additional authentication at startup’, click the radio button for ‘enabled’ and make sure the ‘allow use without TPM module’ option is enabled. Save and exit.
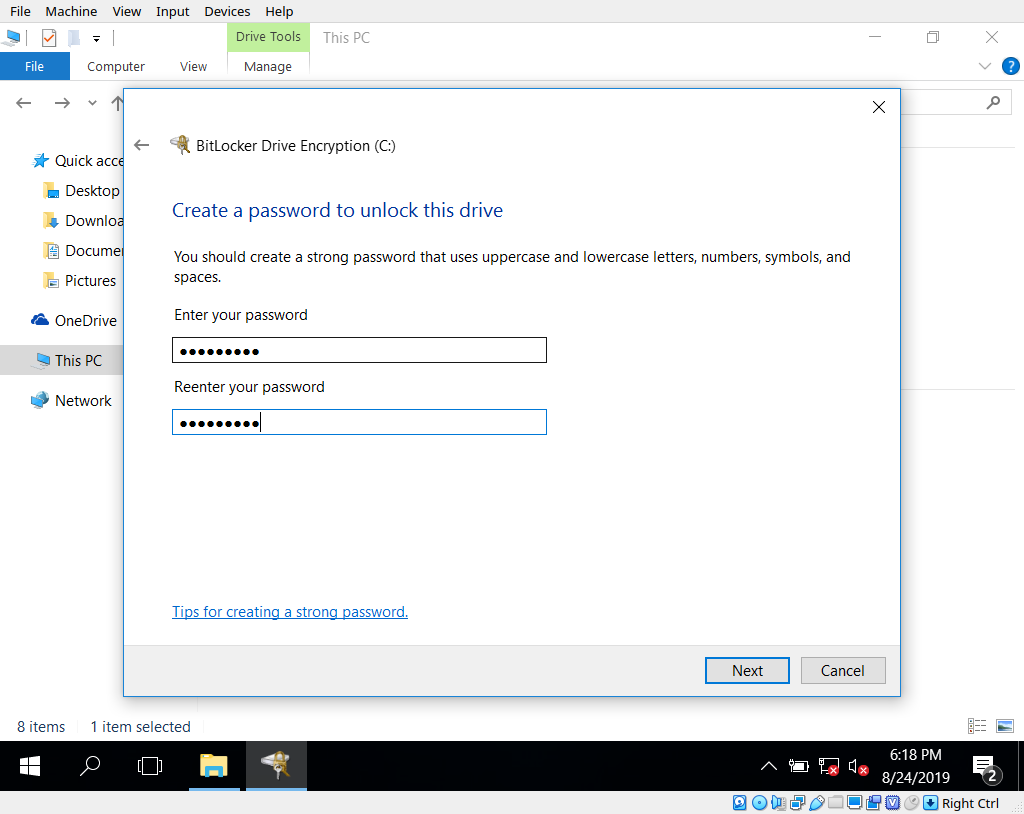
Now if we go back to ‘This PC’ in a windows explorer window we can right click on the C: drive and enable bitlocker encryption. Next Next Next, choose to use a password, and then choose a recovery method. I have no idea why Microsoft thinks forcing you to create a plain text copy of your recovery key is a good idea, but it will force you and it won’t let you save it anywhere on the machine. I chose to use save as a file, and then promptly deleted that file.
Once set up is complete, windows will prompt you to restart to complete the process. Simply restart and select windows from grub.
Thanks for reading!
Sources:
Installation guide. wiki.archlinux.org
UEFI/GPT-based hard drive partitions. docs.microsoft.com
Encrypted Windows and Arch Linux dual-boot installation using UEFI
LVM on LUKS. wiki.archlinux.org
GRUB. wiki.archlinux.org